Menu
CF7 Data Source documentation.
CF7 Data source plugin allows to populate the common "Contact Form 7" fields (text, email, URL, drop-down menu, ...) with data stored in external data sources, like a database, CSV file, URL parameters, users information, post data, taxonomies, Advanced Custom Fields (ACF) - Secured Custom Fields, Server Side functions, and JSON objects.
How it Works?
CF7 Data source includes two new controls in the controls bar of Contact Form 7, recordset and recordset field link. The "recordset" control reads the information from the external data source (a database, a CSV file, or any other of data sources supported), and the "recordset field link" control for linking the recordsets and form fields to populate them with the recordset data.
CF7 Data Source Installation
To install the WordPress plugin follow these steps:
- Download the plugin to your computer
- Go to the plugins section in WordPress
- If has been installed installed another version of the plugin, deactivate it, and then press the corresponding "Delete" button
- Press the "Add New" button at top of section
- Press the "Upload Plugin" button, and select the zipped file downloaded in the first step
- Finally, install and activate the plugin
CF7 Data Source Registration
To activate the commercial features of "CF7 - Data Source" plugin:
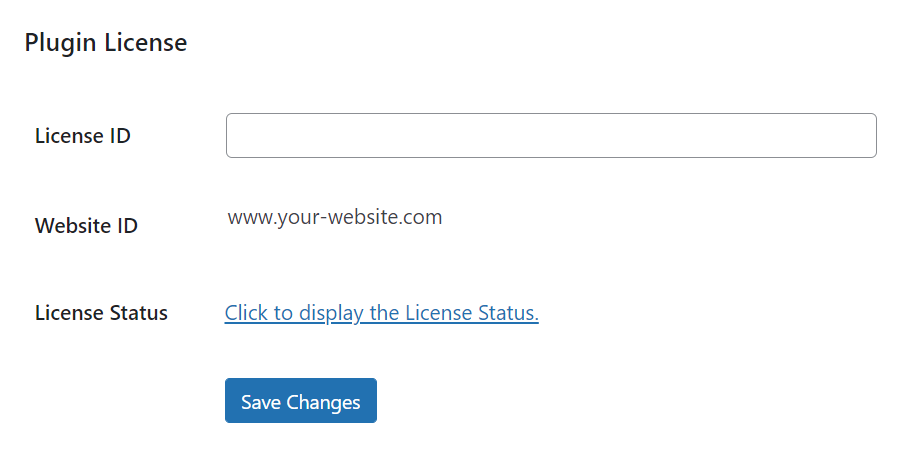
- Go to the menu option: "Contact > Activate CF7 Data Source"
- Enter the License ID
- Check the license status by clicking on the "Click to display the License Status" link
- Finally, press the "Save Changes" button
CF7 Data Source Permissions
Enables the website administrator to define whether only Administrators or both Administrators and Editors are permitted to insert or edit the RecordSet and Field Link controls:
Please note that RecordSet controls can access database information.
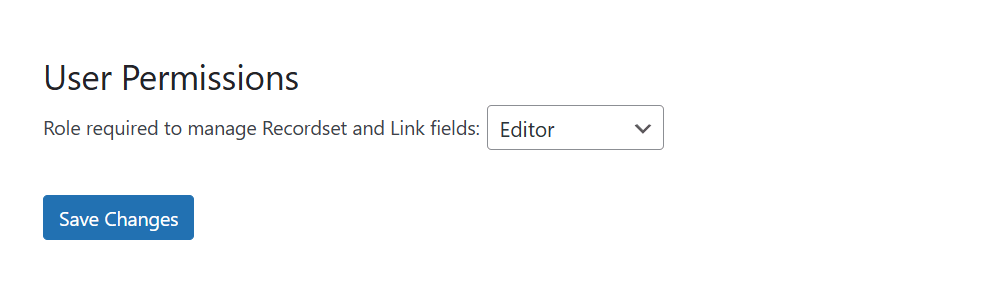
- Go to the menu option: "Contact > Data Source for CF7 Permissions"
- Select the user role
- Finally, press the "Save Changes" button
CF7 Data Source Controls
CF7 Data source includes two new controls in the controls bar of Contact Form 7, recordset and recordset field link.
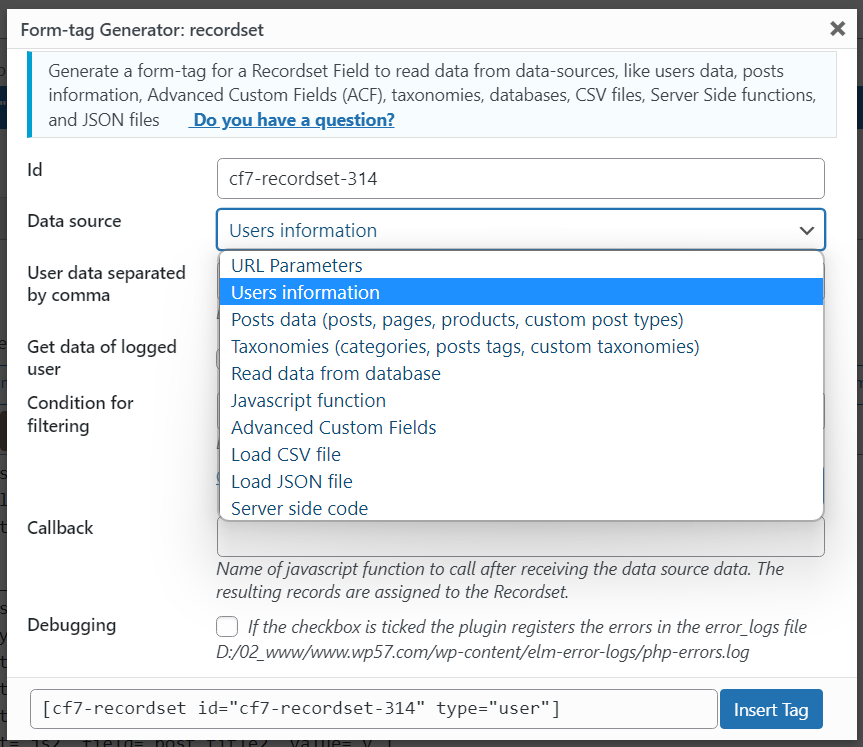
Recordset Control
The recordset control reads the information from the external data source and makes it available on the form. A recordset field can read one or many records from the data source.
To insert a recordset field in the form, press the "recordset" button in the controls bar. This action opens a dialog to define the recordset.
The recordset insertion dialog box includes some attributes that are common to all data sources and attributes that are specific to the selected data source.
The common attributes are:
- Id: the recordset id must be unique in the form. It is important to enter easy to remember ids because you should use them with the "recordset field link" controls.
- Data source: list with the available data sources supported. By selecting a data source, the attributes in the dialog vary to configure the data source connection.
- Callback: name of the javascript function to preprocess the records. The function receives the list of records as a parameter, and assigns the returned records to the Recordset control.
- Debugging: checkbox to enable/disable error debugging. If the checkbox is ticked, possible errors are logged in the error_logs file of the web server.
The data source attributes are described in the Data Source section.
Recordset Field Link Control
The "recordset field link" control links a recordset field to other fields in the form to populate them with the recordset data.
To insert a link field in the form, press the "recordset field link" button in the controls bar. This action opens a dialog to define the relationship between a recordset and a form's field.
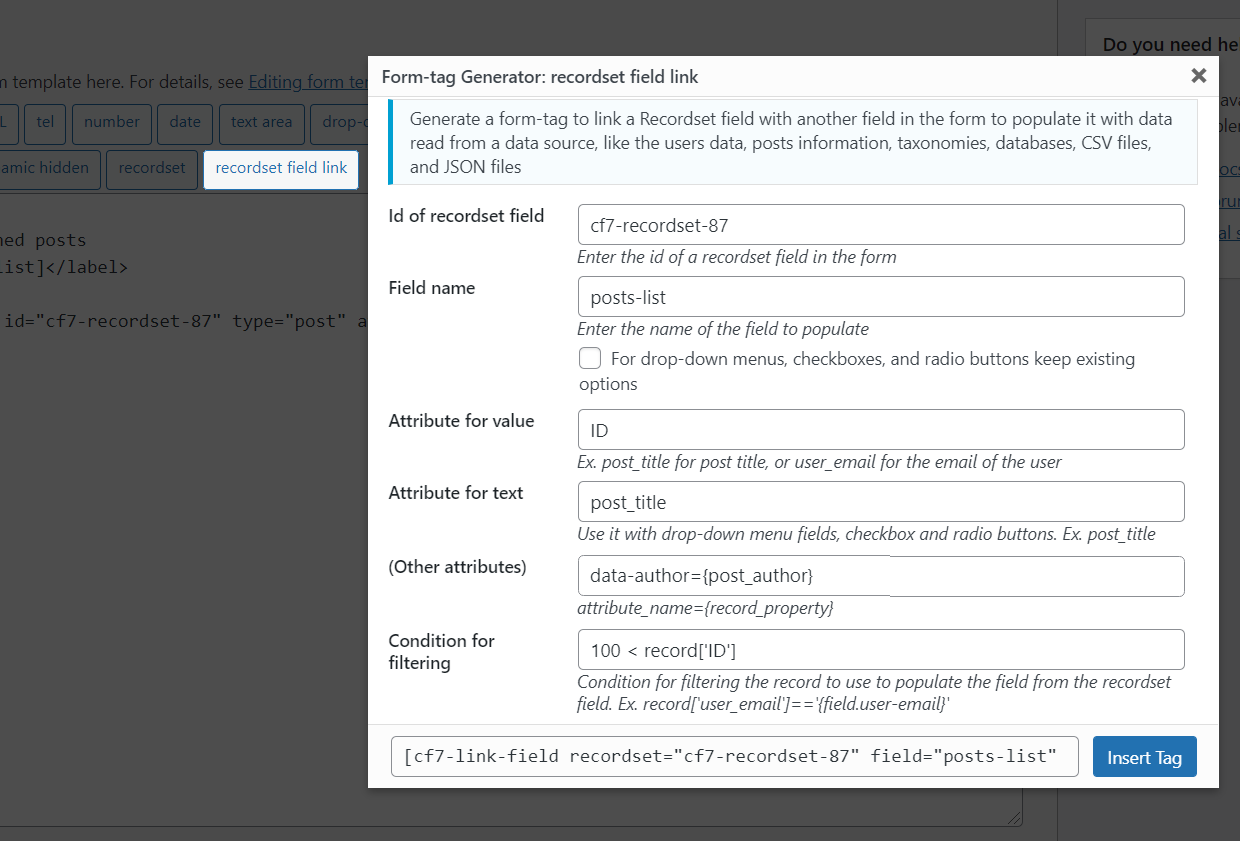
The recordset field link insertion dialog box includes a set of attributes to define the relationship between the recordset field and the form's fields. These attributes are:
- Id of recordset field: the id assigned to the recordset field.
- Field name: the name of the field to populate with the information of recordset.
- Keep existing options: for radio buttons, checkboxes, and drop-down menus it keeps the default options.
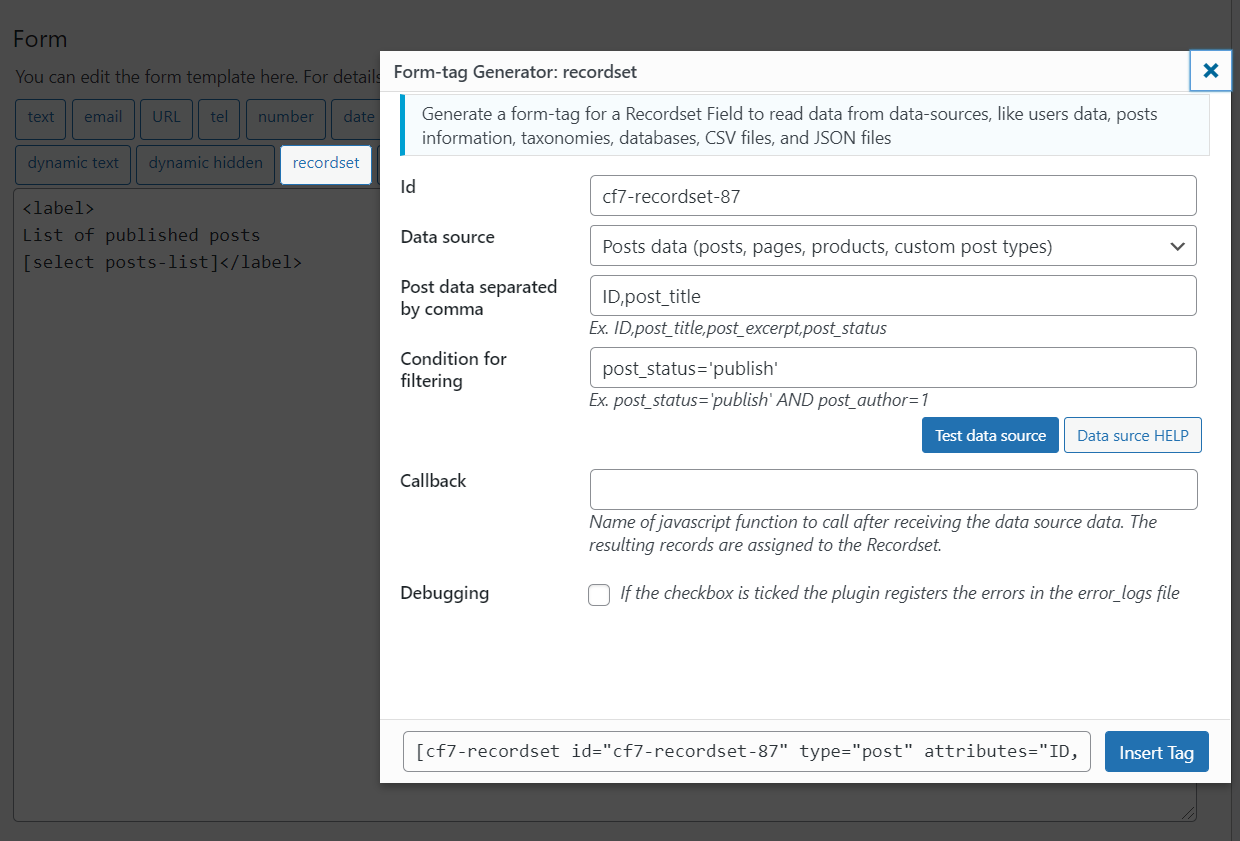
- Attribute for value: a recordset field contains records and a record consists of attributes. Enter the attribute name to be used to populate the field value. In the screenshot above, the recordset field contains records with attributes 'ID' and 'post_title'. It uses the 'ID' as the attribute for value.
- Attribute for text: this attribute applies to fields with multiple choices such as radio buttons, checkboxes and drop-down menu fields. For other fields, this attribute is ignored. Similar to the "attribute for value", enter the name of the attribute to be used to populate the texts of the choices in the field. The above screenshot uses 'post_title' as the attribute for the texts of the choices.
- (Other attributes): allows associating additional attributes to the fields. Enter the attributes names and record properties between {} symbols, like data-author={post_author}. You can include multiple additional attributes separate by space characters data-author={post_author} data-date={post_date}.
- Condition for filtering: as I said many times, a recordset contains records. This attribute allows you to filter the records to populate the form field with only some of them, and not the whole list.
- Limit: Number of records. For some fields the limit is ignored and the plugin uses the first record that satisfies the condition.
- callback: Name of the JavaScript function that is called prior to assigning values to the field. It takes an array of records that meet certain conditions and returns a transformed array, which will then be assigned to the field. Each record passed as a parameter includes all the necessary properties for populating the field -such as "text" and "value"- as well as an additional "record" property that contains the original source record used to generate the assigned record.
Conditions for filtering
The complexity of this attribute deserves its own section.
The "conditions for filtering" attribute allows selecting those records in the recordset field to use to populate the form field. As I said many times a recordset field contains a list of records, and every record consists of attributes.
To refer to an attribute in the records for filtering you should use the piece of code record['attribute name']. The "conditions for filtering" are pieces of valid JavaScript code. Where it is possible the use of comparison operators, like equality (==), less than (<), less than or equal (<=), great than (>), greater than or equal (>=) and not equal (!=), and connector operators like AND (&&), OR (||)
Ex.
						record['ID'] == 123


						record['post_status'] == 'publish'


						record['first_name'] == 'John' && record['last_name'] == 'Doe'


						record['first_name'] == 'John' || record['last_name'] == 'Doe'


						record['post_status'] == 'publish' && (record['post_type'] == 'product' || record['post_type'] == 'download') && record['post_title'].indexOf('music') != -1
Important Note: the plugin encodes some characters when the field is inserted in the form
[ for [
] for ]
< for <
> for >
" for "
Using other fields in the conditions for filtering
The plugin allows using other fields' values in the conditions for filtering. To access the values of other fields in the conditions for filtering use the structure {field.field-name}
Case of use: assuming the form includes three fields. The email field user-email, the text field first-name and the text field last-name.
						<label>Enter your email

						[email user-email]</label>


						<label> Enter your first name

						[text first-name]</label>


						<label> Enter your last name

						[text last-name]</label>
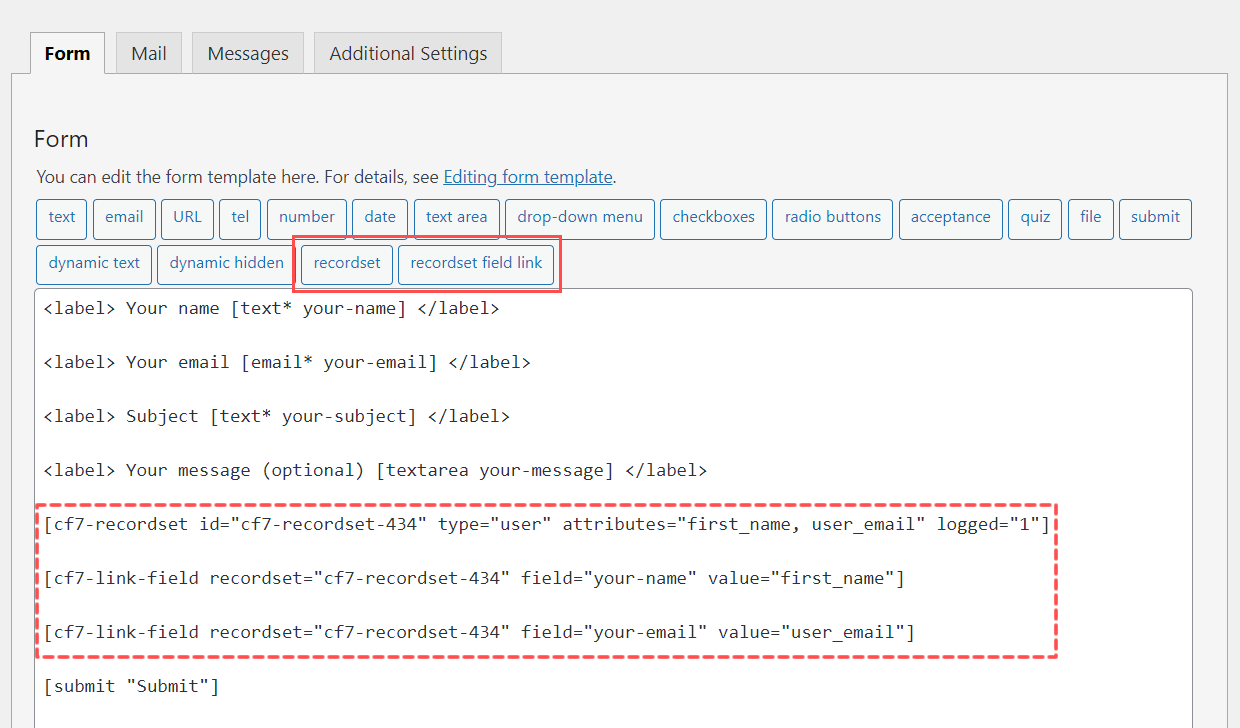
Now, I'll insert a recordset field to read the emails, first_name and last_name of the website's users:
[cf7-recordset id="users-list" type="user" attributes="user_email,first_name,last_name"]
And finally, I'll insert two link fields in the contact form to populate the first name and last name fields from the recordset field based on the email address entered by the user into the "user-email" field:
						[cf7-link-field recordset="users-list" field="first-name" value="first_name" condition="record['user_email'] == '{field.user-email}'"]


						[cf7-link-field recordset="users-list" field="last-name" value="last_name" condition="record['user_email'] == '{field.user-email}'"]
Pay attention to the use of {field.user-email} in the piece of code above.
Complete form's structure:
<label>Enter your email
[email user-email]</label>
<label> Enter your first name
[text first-name]</label>
<label> Enter your last name
[text last-name]</label>
[cf7-recordset id="users-list" type="user" attributes="user_email,first_name,last_name"]
[cf7-link-field recordset="users-list" field="first-name" value="first_name" condition="record['user_email'] == '{field.user-email}'"]
[cf7-link-field recordset="users-list" field="last-name" value="last_name" condition="record['user_email'] == '{field.user-email}'"]
Using variables in the conditions for filtering
Similar to the use of other fields in the conditions for filtering it is possible to use JavaScript variables with the structure {var.variable-name}
Continuing with the previous case of use, if there is a JavaScript variable in the page the user's email <script>var email="johndoe@mail.com";</script> the link fields would be:
						[cf7-link-field recordset="users-list" field="first-name" value="first_name" condition="record['user_email'] == '{var.email}'"]


						[cf7-link-field recordset="users-list" field="last-name" value="last_name" condition="record['user_email'] == '{var.email}'"]
Variables have a particularity, they allow you to access the URL parameters to be used in the RecordSet and RecordSet-Field Link fields for filtering. To access the URL parameters use the format {var.url.parameter-name}
Using templates to display complex data structures
There are situations where we need to populate a field with a complex data structure that includes multiple attributes in the recordset records or a combination of the record attributes and HTML. For example, fill a text field with the user's logged first name and last name.
In these cases, we need to use templates. A template is represented by a <template> tag with an id attribute, whose content will be combined with the recordset records to generate the fields' texts and values. Ex. <template id="user-name"></template>
To use a template to generate the field's text or value, you should use the structure: {template.template-id} where template-id must be replaced with the id attribute in the template tag. Ex. [cf7-link-field recordset="user-info" field="user-name" value="{template.user-name}"]
To refer the records' attributes from the template you should use the structure: {attribute.attribute-name} where attribute-name must be replaced by the attribute's name in the record. Ex.<template id="user-name">{attribute.first_name} {attribute.last_name}</template>
The complete example code:
						<label> User name (first name and last name)

						[text user-name]</label>


						[cf7-recordset id="user-info" type="user" attributes="first_name,last_name" logged="1"]


						[cf7-link-field recordset="user-info" field="user-name" value="{template.user-name}"]


						<template id="user-name">{attribute.first_name} {attribute.last_name}</template>
Recordset Data Sources
The "recordset" control reads information from external data sources (a database, a CSV file, or any other of data sources supported) and makes it available on the form. The data source is selected from the "Recordset insertion dialog", and based on the data source selected there are enabled a new set of fields:
The next sections describe the different data sources' attributes.
URL Parameters - Data Source
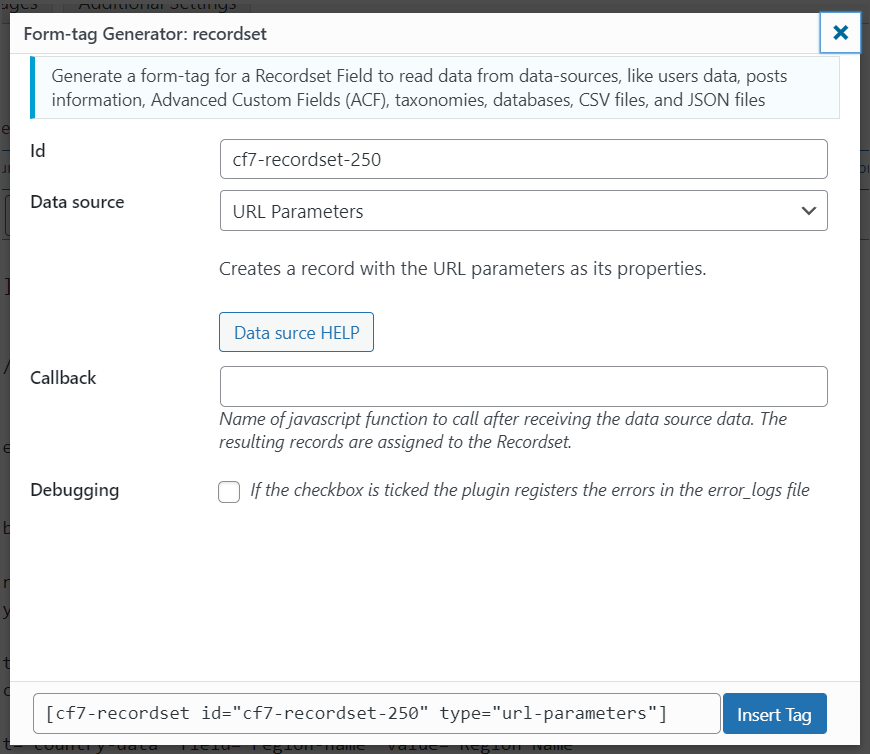
Creates a recordset with the parameters received by GET. The URL Parameters data source does not require any configuration or attributes.
Form example
						<label>First Parameter

						[email parameter-1]</label>


						<label> Second Parameter

						[text parameter-2]</label>


						[cf7-recordset id="get-parameters" type="url-parameters"]


						[cf7-link-field recordset="get-parameters" field="parameter-1" value="param1"]


						[cf7-link-field recordset="get-parameters" field="parameter-2" value="param2"]
After inserting the form, visit the page with param1 and param2 parameters:
?param1=value-a¶m2=value-b
User Information - Data Source
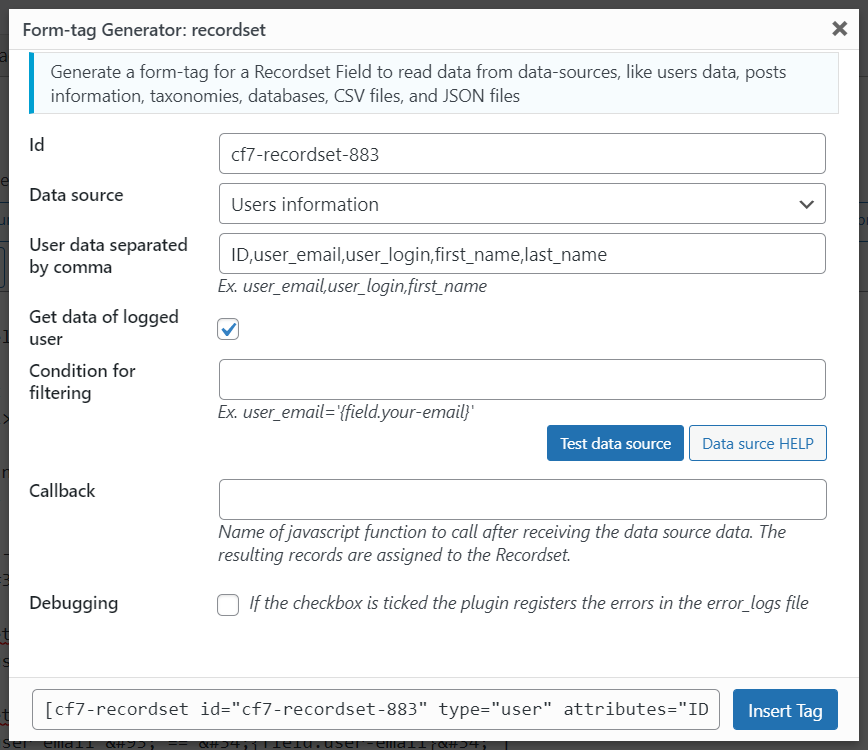
The User Information data source allows getting the users' information. The data source attributes are:
- User data separated by comma: accepts the list of columns' names for the wp_users table and the names of metadata, all of them must be separated by comma symbols. Ex. ID,user_email,user_login,first_name,last_name.
- Get data of logged user: checkbox to access the data of the registered user.
- Condition for filtering: enter the columns and values to use for filtering users' information. Ex.
user_login='info'to return the information of the user whose login is info.
Form example
<label>Enter your email
[email user-email]</label>
<label> Enter your first name
[text first-name]</label>
<label> Enter your last name
[text last-name]</label>
[cf7-recordset id="users-list" type="user" attributes="user_email,first_name,last_name"]
[cf7-link-field recordset="users-list" field="first-name" value="first_name" condition="record['user_email'] == '{field.user-email}'"]
[cf7-link-field recordset="users-list" field="last-name" value="last_name" condition="record['user_email'] == '{field.user-email}'"]
Post Data - Data Source
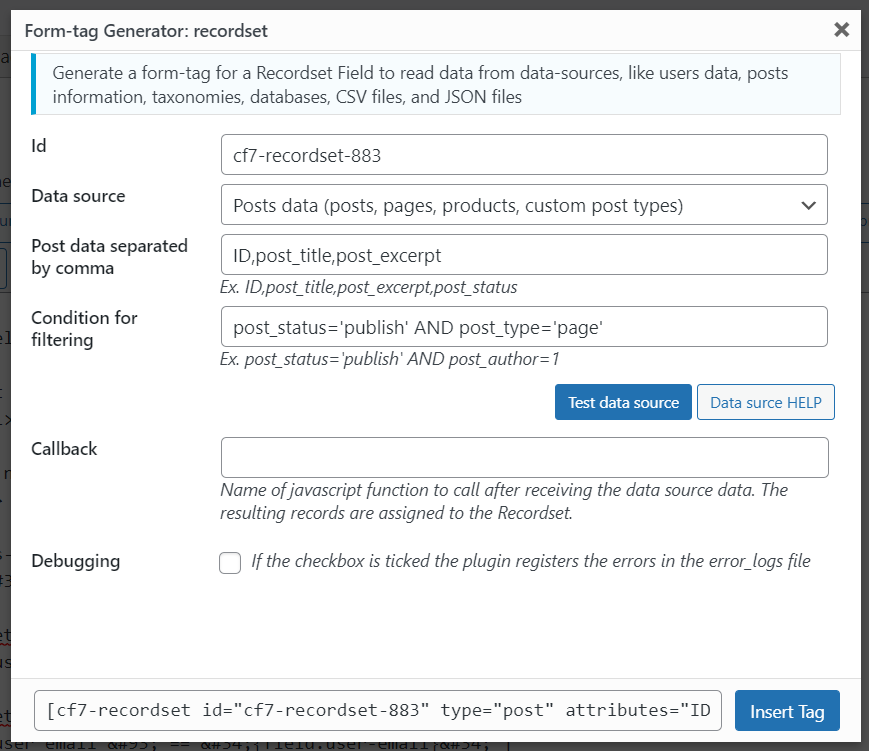
The Posts Data data source allows getting the information of posts (posts, pages, products, or any other custom post type), like their ids, titles, excerpts, contents, or any other column of wp_posts database's table. The data source attributes are:
- Post data separated by comma: accepts the list of the columns' names of the wp_posts table separated by comma symbols. Ex. ID,post_title,post_status,post_excerpt,post_content.
- Condition for filtering: enter the columns and values to use for filtering the posts. Ex.
post_status='publish' AND post_type='product'to return the list of published WooCommerce products. - Current post/page: tick the checkbox to get the data from the page/post where the "Contact Form 7" is inserted.
Form example
						<label>Products List
						[select products-list]</label>


						[cf7-recordset id="products-recordset" type="post" attributes="ID,post_title" condition="post_status='publish' AND post_type='product'"]


						[cf7-link-field recordset="products-recordset" field="products-list" value="ID" text="post_title"]
Advanced Custom Fields (ACF) - Secured Custom Fields - Data Source
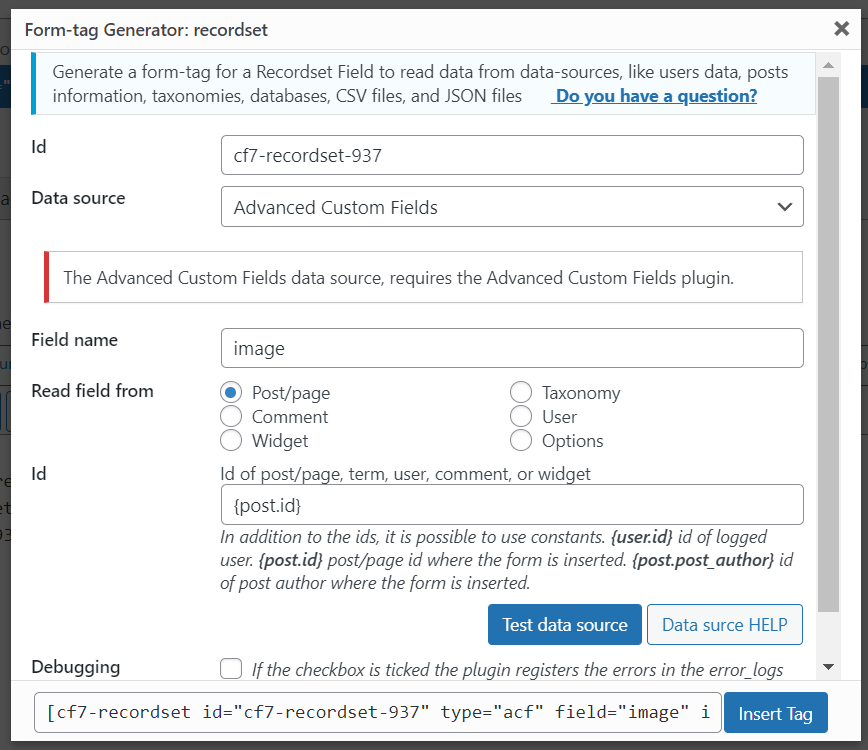
The Advanced Custom Fields (ACF) - Secured Custom Fields data source allows getting the information from custom fields in posts, users, comments, taxonomies, widgets, and options. The data source requires the Advanced Custom Fields or Secured Custom Fields plugin be installed on WordPress. The data source attributes are:
- Field name: name of the custom field.
- Read field from: radio buttons with the possible source types (Post/page, User, Taxonomy, Comment, Widgets, Options).
- Id: id of post, comment, term, user, or widget. The attribute supports constants like: {user.id} for the id of logged user, {post.id} for the post/page id where the contact form is inserted, {post.post_author} for the user's id of the post/page author.
For user, the interface includes a checkbox to load the custom field from logged user.
Taxonomies - Data Source
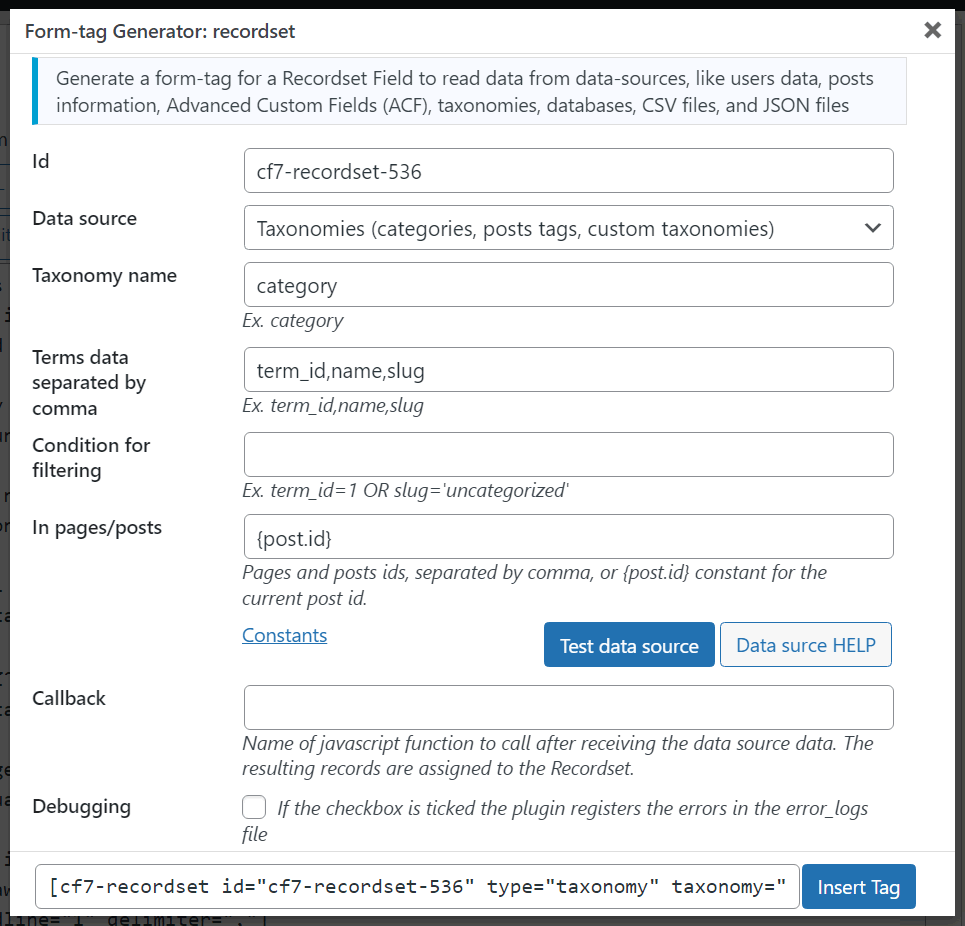
The Taxonomies data source allows accessing the taxonomies terms data (term_id, name, slug). The data source attributes are:
- Taxonomy name: enter the name of the taxonomy whose terms will be read, like category, post_tag, or any other custom taxonomy
- Terms data separated by comma: accepts the list of terms attributes separated by comma symbols. They correspond to the columns' names in the wp_terms table. Ex. term_id,name,slug.
- Condition for filtering: enter the columns and values to use for filtering the terms. Ex.
name LIKE '%trip%'to get all terms that include trip text in their names. - In pages/posts: enter the pages and posts ids, separated by comma, or
{post.id}constant for the current post id.
Form example
							<label>Tours

							[select tours-category]</label>


							[cf7-recordset id="category-terms" type="taxonomy" taxonomy="category" attributes="term_id,name" condition="name LIKE '%trip%'" in="{post.id}"]


							[cf7-link-field recordset="category-terms" field="tours-category" value="term_id" text="name"]
Database - Data Source
The SQL Generator modules generate the database queries in a more conversational style. Just describe the information needed, and get the DB query without any prior database knowledge.
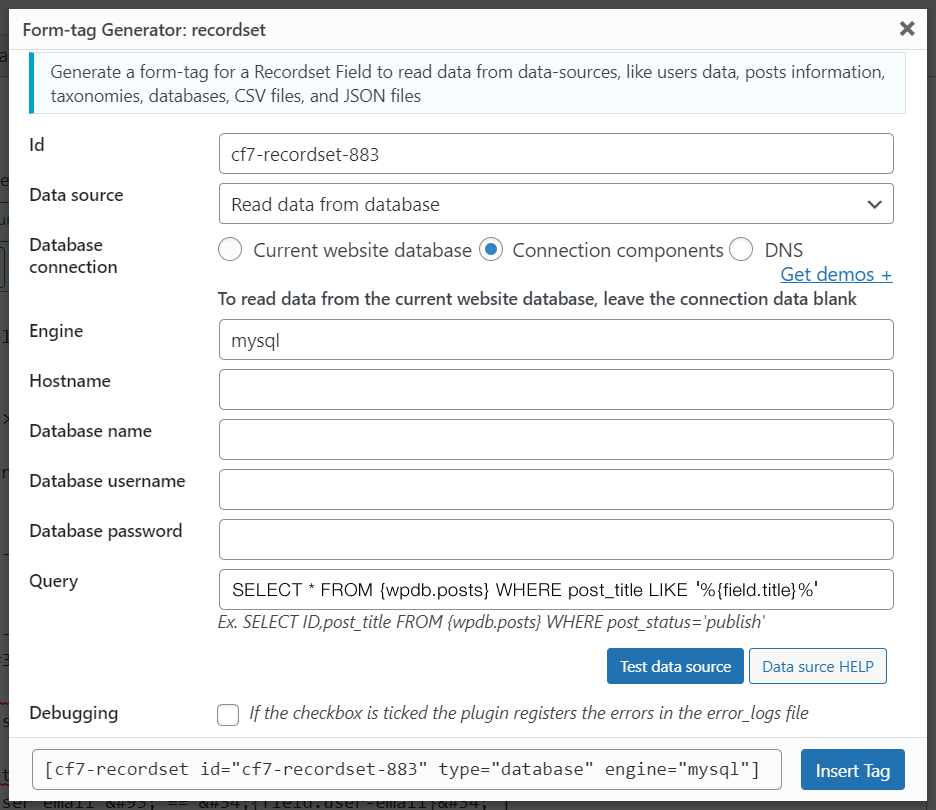
The Database data source allows reading the data from databases. This data source covers the functionalities of the Users, Posts, and Taxonomies data sources.
The database data source allows to read the information from the following database engines:
MySQL
MS SQL Server
Oracle
PostgreSQL
SQLite
IBM
Firebird
Informix
ODBC and DB2
CUBRID
4D
The database connection can be configured by its components or DNS.
To read the data from the website's database, leave empty the database connection attributes.
Database data source attributes:
- Database connection: radio button with two choices, Connection components, and DNS.
- Engine: enter the database engine.
- Hostname: database hostname.
- Database name: name of the database.
- Database username: username for database connection.
- Database password: password for database connection.
- DNS: enter the DNS for database connection instead of the database connection components.
- Query: SQL query for reading the information from the database.
Query attribute
The query attribute looks complex, but it is the most powerful tool of the plugin. Its value would be a valid SQL query.
In the query, it is possible to use constants for the table names, users' data, or blog information.
Here are some sample queries with their descriptions:
List of users with their ids, emails, and logins
SELECT ID, user_email, user_login FROM {wpdb.users}
In WordPress, the prefix of database tables is defined into the wp-config.php file. So, the name of the "users" table can be different by website, wp_users, wp2_users, or any other prefix. Use the {wpdb.users} constant for the name of the "users" table in the current website. The use of constants avoids the necessity to know the prefix.
First name and last name of logged user:
SELECT t1.meta_value as first_name, t2.meta_value as last_name FROM {wpdb.usermeta} t1, {wpdb.usermeta} t2 WHERE t1.meta_key = 'first_name' AND t2.meta_key = 'last_name' AND t1.user_id = t2.user_id AND t1.user_id = {user.id}
The {wpdb.usermeta} constant corresponds to the wp_usermeta table name, and the {user.id} constant is replaced by the id of the logged user.
List of ids and titles of published posts:
SELECT ID, post_title FROM {wpdb.posts} WHERE post_status='publish' AND post_type='post'
The {wpdb.posts} constant corresponds to the wp_posts database's table.
Into the queries, it is possible to use the values of other fields in the form. In the following example, the web form contains the drop-down menu named users-list where the options' values are the users' ids and their texts the users' names. This query returns the list of posts written by the selected user:
SELECT ID, post_title FROM {wpdb.posts} WHERE post_status='publish' AND post_author={field.users-list}
The {wpdb.posts} constant corresponds to the wp_posts database's table. To access the values of other fields in the query use the structure {field.field-name}
In this case {field.users-list} refers to the value of the users-list field.
The complete list of constants is described in the "Constants" section.
CSV File - Data Source
The CSV File data source reads a CSV file and makes its records available for the form. The data source attributes are:
- URL to the CSV file: enter the URL to a valid CSV file.
- CSV file includes headline: tick the checkbox if the first row in the CSV file is a headline with the columns' names. The columns' names are used as the names of the records' attributes. If the CSV file does not include a headline row, the plugin would use the attributes' names: column_0, column_1, column_2, and so on.
- Delimiter: enter the character used by the CSV file to separate the cells. If the CSV file uses the tabulator character as the delimiter, you should enter the
tabword.
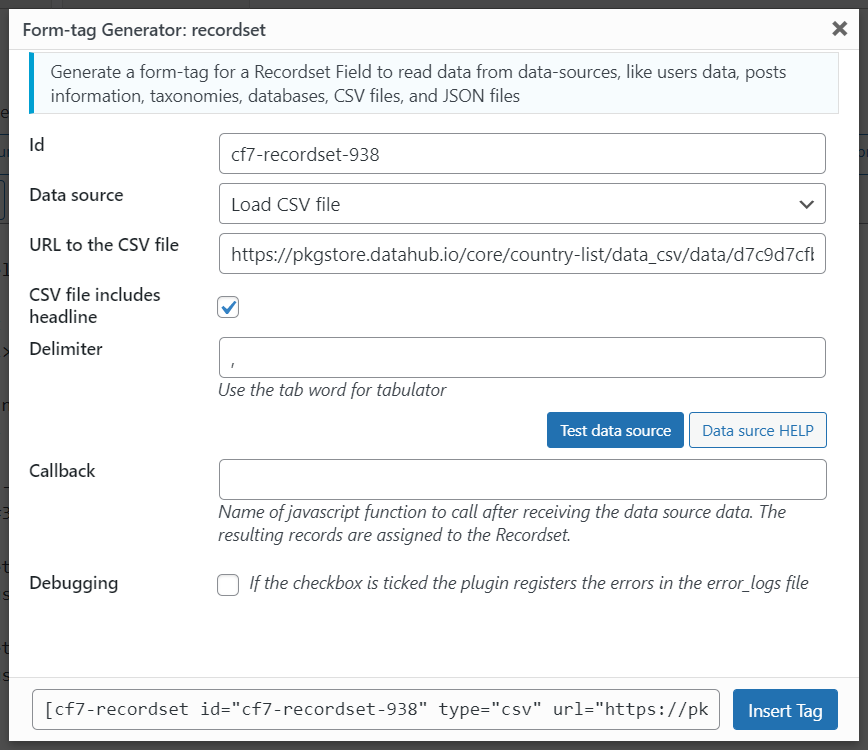
Form example
It populates the drop-down menu field with the list of countries read from a CSV file.
						<label>Country

						[select country]</label>


						[cf7-recordset id="country-list" type="csv" url="https://pkgstore.datahub.io/core/country-list/data_csv/data/d7c9d7cfb42cb69f4422dec222dbbaa8/data_csv.csv" headline="1" delimiter=","]


						[cf7-link-field recordset="country-list" field="country" value="Name" text="Name"]
JSON File - Data Source
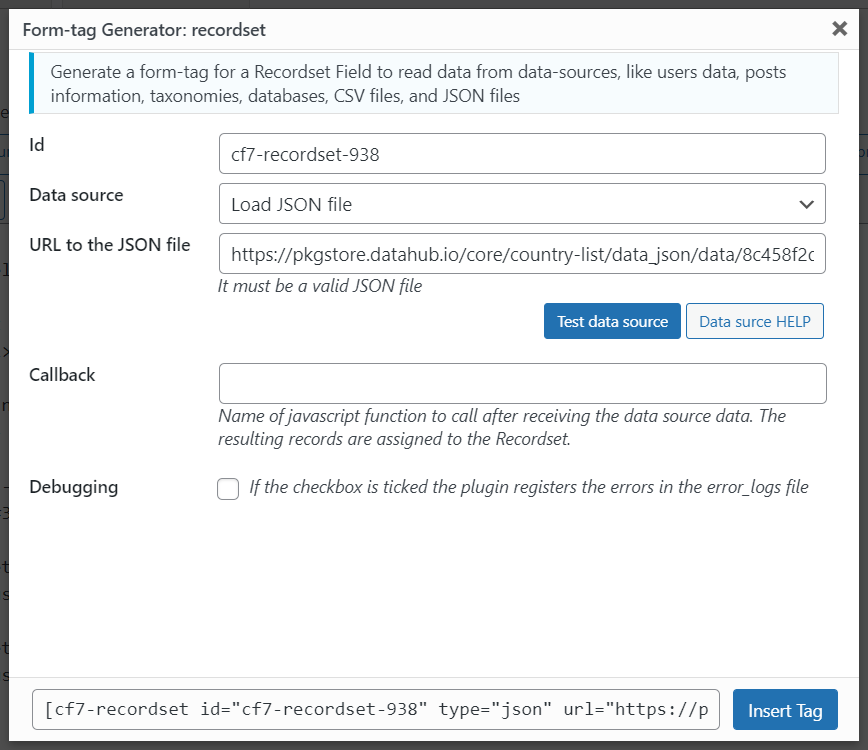
The JSON File data source reads a JSON file and makes its records available for the form. The data source attributes are:
- URL to the JSON file: enter the URL to a valid JSON file.
Form example
						<label>Country

						[select country]</label>


						[cf7-recordset id="country-list" type="json" url="https://pkgstore.datahub.io/core/country-list/data_json/data/8c458f2d15d9f2119654b29ede6e45b8/data_json.json"]


						[cf7-link-field recordset="country-list" field="country" value="Name" text="Name"]
Javascript Function - Data Source
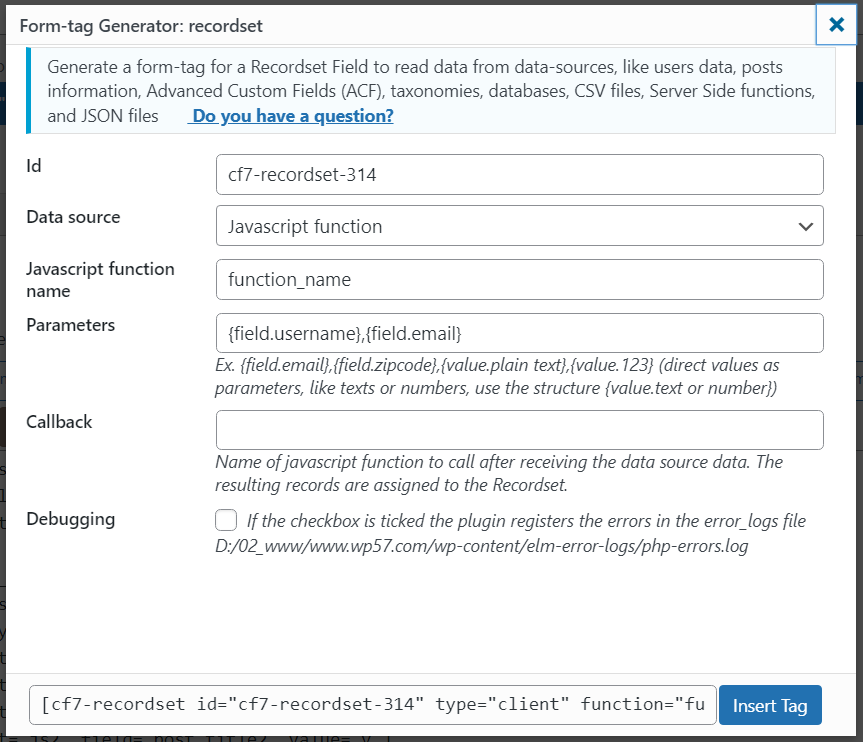
The Javascript Function data source reads the records list from a javascript function. The data source attributes are:
- Javascript function name: enter the name of the javascript function.
- Parameters: enter the function parameters separated by commas. The parameters can be fields' names
{field.field-name}, variables{var.variable-name}, and values{value.text-or-number}.
Server Side - Data Source
Retrieve information from third-party services and APIs.
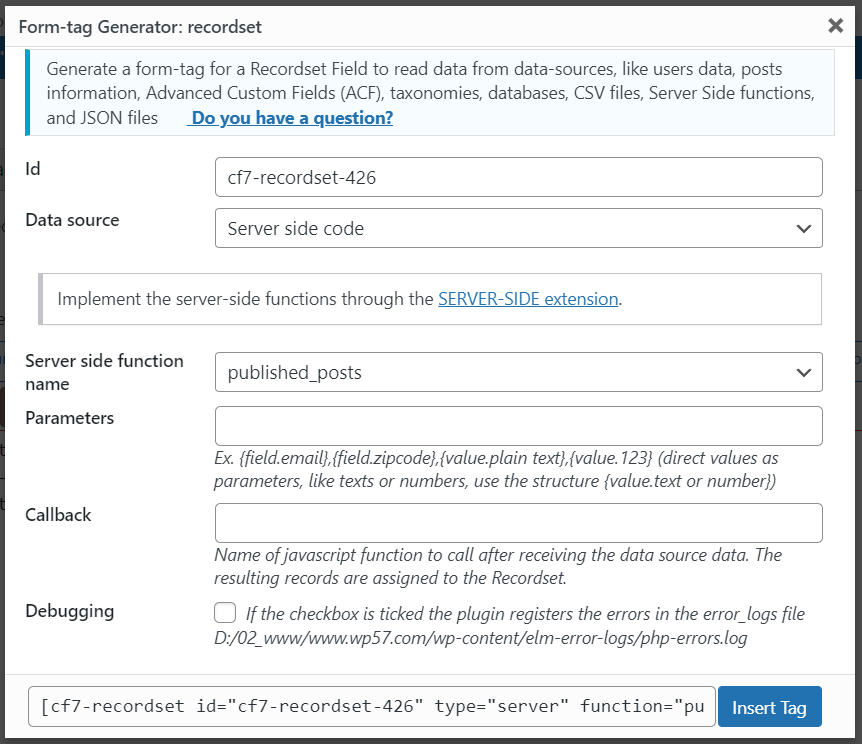
The Server Side data source reads the records list from server side functions implemented via the "Server Side" add-on. The data source attributes are:
- Server side function name: list of the available server side functions.
- Parameters: enter the function parameters separated by commas. The parameters can be fields' names
{field.field-name}, variables{var.variable-name}, and values{value.text-or-number}.
Editing Existing Recordset Tags
Unlike other controls in contact form 7, where editors must know the structure of the tags to modify them once inserted into the form, our plugin Data source for contact form 7 allows you to edit the recordset tags visually, improving the user experience. For this we have a new icon in the upper right corner of the form editing area.
The icon is semi-transparent by default so as not to interfere with the content of the form while editing it.
When you move the mouse over the icon, it displays a menu with the identifiers of the recordset tags.
We just have to click on the element we want to edit and the plugin will open the same insertion dialog from which we can edit the different attributes of the tag.
And unlike the insert dialog, this one has an update button to apply the changes to the selected recordset tag.
Constants
List of constants to use with the recordset fields:
Database Constants
The plugin includes some constants you can use with the queries in the Database Data Source. The constants are enclosed between curly brackets like {wpdb.prefix}
{wpdb.prefix} prefix used by WordPress in the name of database's tables, for example, the text "wp_" into the table's name "wp_posts"
{wpdb.comments} the name of Comments table
{wpdb.commentmeta} the name of Comment Metadata table
{wpdb.links} the name of Links table
{wpdb.options} the name of Options table
{wpdb.postmeta} the name of Post Metadata table
{wpdb.posts} the name of Posts table
{wpdb.terms} the name of Terms table
{wpdb.term_relationships} the name of Term Relationships table
{wpdb.term_taxonomy} the name of Term Taxonomy table
{wpdb.termmeta} the name of Term Meta table
{wpdb.usermeta} name of User Metadata table
{wpdb.users} the name of Users table
{wpdb.blogs} the name of Multisite Blogs table
{wpdb.blog_versions} the name of Multisite Blog Versions table
{wpdb.site} the name of Multisite Sites table
{wpdb.sitecategories} the name of Multisite Sitewide Terms table
{wpdb.sitemeta} the name of Multisite Site Metadata table
Website Constants
{blog.id} the id of the current blog (Helpful in multisite WordPress installations)
User Constants
{user.id} the id of the current user
{user.login} the username of the current user
{user.nicename} the URL-friendly name for the current user
{user.email} the email address of the current user
{user.url} the URL associated to the current user
{user.display_name} the user's name that is shown on the site for the current user
{user.first_name} the first name of current user
{user.last_name} the last name of current user
Current Post Constants
Allows access to the post information where the contact form is inserted.
{post.id} unique number assigned to each post
{post.post_author} the user ID who created it
{post.post_date} time and date of post creation
{post.post_date_gmt} GMT time and date of creation
{post.post_content} holds all the content for the post, including HTML, shortcodes and other content
{post.post_title} title of the post
{post.post_excerpt} custom intro or short version of the content
{post.post_status} status of the post, e.g. draft, pending, private, publish
{post.comment_status} if comments are allowed
{post.ping_status} if the post allows ping and trackbacks
{post.post_password} optional password used to view the post
{post.post_name} URL friendly slug of the post title
{post.to_ping} a list of URLs WordPress should send pingbacks to when updated
{post.pinged} a list of URLs WordPress has sent pingbacks to when updated
{post.post_modified} time and date of last modification
{post.post_modified_gmt} GMT time and date of last modification
{post.guid} Global Unique Identifier, the permanent URL to the post, not the permalink version
{post.menu_order} holds the display number for pages and other non-post types
{post.post_type} the content type identifier
{post.comment_count} total number of comments, pingbacks and trackbacks
Record Constants
{record.index} record's index to use in the condition attribute of [cf7-link-field] shortcode. Ex. The records indexes begin at zero. If you want to access the attributes in the second record, you can enter the following condition in the [cf7-link-field] shortcode {record.index} == 1
JavaScript Events
The plugin triggers cf7-recordset javascript events after reading the data from data sources. This behavior allows using the data received from your blocks of code.
I'll try to describe the process with a practical example.
Assuming the contact form includes a recordset field with id="user-data". This field reads the information of the logged user with the "first_name" and "last_name" attributes. And I want to include a DIV tag after the <body> tag with a text similar to "Hello John Doe"
Insert a script block in the page where the contact form is insert, or directly into the contact form with the code:
						<script>

						document.addEventListener('cf7-recordset', function(evt){

						if(evt.detail['recordset-id'] == 'user-data')

						{

						jQuery('body').prepend('Hello '+evt.detail['recordset-data'][0]['first_name']+' '+evt.detail['recordset-data'][0]['last_name']);
						}
						});
						</script>
The piece of code above sets a listener for the "cf7-recordset" event triggered by the plugin.
The event "detail" property includes two attributes, "recordset-id" with the id of the recordset field that triggered the event and "recordset-data" with the information received from the data source.
The code of the listener checks if the field that triggered the event was the "user-data":
if(evt.detail['recordset-id'] == 'user-data')
And the code inside it accesses the information of the first record in the recordset field: evt.detail['recordset-data'][0]['first_name'] and evt.detail['recordset-data'][0]['last_name']
Another example
In addition, the plugin triggers an onchange event with the cf7-ds-fill parameter when it fills the form fields with the recordset data.
Ex. In the following piece of code, the plugin display an alert when fills the country field.
						<label>Country

						[select country]</label>


						[cf7-recordset id="country-list" type="csv" url="https://pkgstore.datahub.io/core/country-list/data_csv/data/d7c9d7cfb42cb69f4422dec222dbbaa8/data_csv.csv" headline="1" delimiter=","]


						[cf7-link-field recordset="country-list" field="country" value="Name" text="Name"]


                        <script>

						jQuery(document).on('change', '[name="country"]', function(evt, attr){

                            if(attr == 'cf7-ds-fill') alert('The country list is available');

                        });

						</script>
Functions Reference
The plugin implementes some javascript functions you can call from your code.
cf7_datasource_get_recordset_data, receives recordset id as its parameter and returns an array with the records list.
cf7_datasource_set_recordset_data, populates the recordset records. It requires two parameters, the recordset id, and an array with the records list.
cf7_datasource_recordset_reload, calls the routine that loads the recordset records. It requires the recordset id as its parameter.
cf7_datasource_field_reload, refresh the value of a field linked to a recordset via [cf7-link-field] tag. The function receives two parameters, the field's name and recordset id.